This is default featured slide 1 title

Go to Blogger edit html and find these sentences.Now replace these sentences with your own descriptions.This theme is Bloggerized by Lasantha Bandara - Premiumbloggertemplates.com.

This is default featured slide 2 title

Go to Blogger edit html and find these sentences.Now replace these sentences with your own descriptions.This theme is Bloggerized by Lasantha Bandara - Premiumbloggertemplates.com.

This is default featured slide 3 title

Go to Blogger edit html and find these sentences.Now replace these sentences with your own descriptions.This theme is Bloggerized by Lasantha Bandara - Premiumbloggertemplates.com.

This is default featured slide 4 title

Go to Blogger edit html and find these sentences.Now replace these sentences with your own descriptions.This theme is Bloggerized by Lasantha Bandara - Premiumbloggertemplates.com.

This is default featured slide 5 title

Go to Blogger edit html and find these sentences.Now replace these sentences with your own descriptions.This theme is Bloggerized by Lasantha Bandara - Premiumbloggertemplates.com.

Showing posts with label Android tips. Show all posts

Wednesday, 22 June 2016

How To Increase The Volume Of Your Android Phone Beyond The Manufacturer Set Up Volume

This tutorial will work perfectly for those looking for way to increase their Android volume. If you are an Android User encountering low volume from your Android device when making or answering call, when playing Music, Videos etc. Follow the below steps to resolve it.

Before we proceed, note that this tutorial will enable you to increase your mobile headphones and loudspeaker x3 or whichever increase you choose wish to set it. The choice is yours to make.


==>Step 1. Download Mobile Uncle Tools application from playstore, as it will enable you to have access to the developer option.

==>Step 2.Your device has to be rooted for access.

==>Step 3. Lunch Mobile Uncle App you downloaded from step one, and Locate Engineer mode (MTK)

==>Step 4. look for Hardware Testing
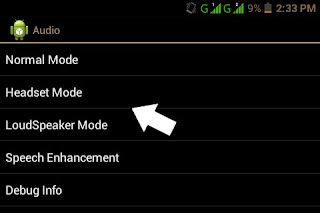
>>>Click on Audio
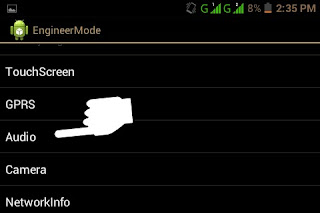


==>To increase the headphone volume of your Android.
=>Click on "headphone"
=> Select and increase Max vol 0 -160, increase to any number of your choice below 160 or choose 160, then set. see screenshot below:
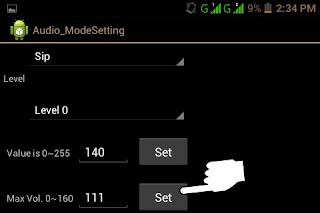


==> To increase the Loudspeaker of your Android.
=>Click on "Loudspeaker"
=> Select and increase Max vol 0 -160, increase to any number of your choice below 160 or choose 160, then set.

After the set up, go back and check your Android volume and see how good it is. If you have any question on this tutorial, use the comment box below to ask your questions.

Just enjoy your smart phone...
Share:

How To Share Your Android Simple-Server, Psiphon Connection Via WiFi Hotspot To PC

I know most of you guys are in search of this kind of tutorial that will go a long way to show you how to enable your Android Simple server, psiphon, openvpn, tweakware,and jwp to connect to your laptop/pc through WiFi Hotspot. Even how to connect your Etisalat social and that of MTN bis internet from mobile devices to pc through wifi connection without simple server being involved. If you are in such category, don't search again because, the final solution is here for you. So today I will show you how to get all your pc powered with server connection from your mobile device with the help of a powerful  software called pdnet+.

PdaNet+ is one of the top categorised Android apps of all time. It gives you access to share an internet connection from your mobile devices (Android) to PC or Tablet. It requires no root access to work on your Android, so that is to say, it works very well on all Android devices.


To have it, PdaNet+ go a long way in allowing your laptop/pc to connect online wirelesly via Simple server's network connection on your mobile devices ( Android ) That is to say, no need to set up any kind of proxy and that of port of any sort on your laptop browsers because, is a direct connection transfer from your Android device. To get it set up on your devices follow up the below steps.


Requirements For It To Get Configured are:
==>Your Android device
==>A laptop/PC
==>A USB cable

The Softwares Needed are as follow:
==>Pdnet+ for your Android device, download it Here
==>A FoxFi key pdnet+ for your Android, Get it Here
==>And finally, a Pdnet+ for your laptop/pc, get it Here

To share Your Android Vpn Network to Laptop/pc Using This App PdaNet+, follow the below steps accurately.

==>Step 1. Get the PdaNET+ you downloaded for your android device installed on your Android.

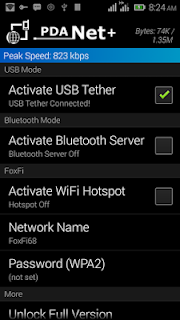
==>Step 2. Lunch the PdaNET+ app on your Android and now, Activate the USB TETHER you see in the pdaNet+. See screenshot below


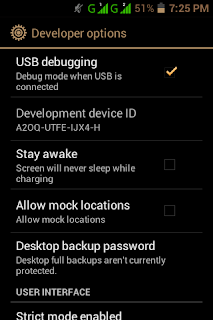
Note: Make sure your USB debugging is enabled on your Android. To do so, go to your Phone settings >> click on Developer options >> now enable it by ticking the small box you see for USB debugging. See screenshot below,


==>Step 3. Get PdaNET+ you downloaded for laptop/PC  installed on your laptop.

==>Step 4. Now, Connect your Android device through a USB cable to your laptop

Note This: Make sure the particular Vpn you are using for this, be it simple serve, psiphon tweakware etc is already connected on your Android device. If not, get it connected.


==>Step 5. Open the PdaNet software installed on your laptop/pc, now, click on where you see "Connect internet", when you click it, the software will verify and authenticate the connection and by so doing, now it will display connected. That's it.


As you can see, you have successfully shared your VPN connection to your laptop, go ahead and enjoy connecting more VPN servers without proxy set up on your PC. Also for those that don't have modem for browsing, this can help until you get yours for your pc.
Share:

Learn How To Undo And Redo Text On Any Android Device Using Inputting+ CTRL Z/ CTRL Y

Today, I will be teaching you guys how to use an option of Redo and Undo on your smart android devices.
Hope you know, there is no option to redo or even undo if you mistakenly clear or type text on any android phone. Am going to guide you on that with simplified steps, so that whenever you mistakenly wipe huge text, you can be able to retrieve it back through undo or redo option. This guide will benefit all using android right from U.S.A and other countries, as long as, your device is android. Read on to see how to use short codes like Ctrl Z or Ctrl Y for redo and undo on your android device.


 undo and redo on any android

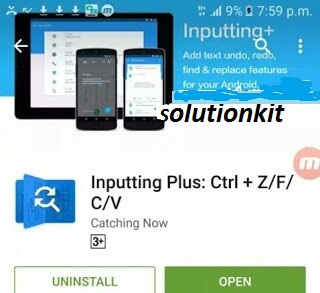
Making sure you don't loose your mistakenly wiped huge text, probably when typing message or note with your android device, then you need to achieve the option of redo and undo with a third party application called "Inputting+ App" which can help to redo and undo your typed text.
 
undo app


First thing to do, is to download this app, so that you can get started with the guide.
Now  Download Inputting+ Apk Android App by clicking Here.

After downloading, install it to your device and then follow the steps below to activate it in order for it to function on your device.

How To Use Inputting+ App
=> Grant the app permission in order for it to be installed on your device, you can do that through your phone settings.

=> Now, this Inputting+ app will be showing on your phone panel notification

Note: The Inputting app get activated at any moment you are about to type text, it also track the whole thing you are typing or editing at that very moment. One thing is sure about it, and that is, it doesn't store all you are typing online, so that is to say, your security is guaranteed.

=> Finally, Make use of the arrow in the app, for your redo or undo whenever you mistakenly misplace words or clear texts. The application is compatible for all android device keyboard. That's all for the guide, now, go ahead and enjoy using the functions.

You can now redo and undo  your text at any time and any day with inputting app, Comment and tell us how yours is functioning on your device.

Solutionkit is here to give you solution to all your problems. Try to share with your friends
Share:

Tuesday, 21 June 2016

How To Use MTN VSF 2GB DATA On Your Android Devices

How To Use MTN VSF 2GB DATA On Your Android Devices

MTN Blackberry Bundle Free 2GB has been available for a while, but to browse with it on other device is the major problem, but I’m glad
to tell you that you can now flex with your free MTN VSF Blackberry Bundle on Android device with the help of imei tweaking and Psiphon VPN.


HOW TO GET MTN VSF 2GB DATA

◾   All you have to do is text JKCJHC to 444

◾   You will receive a message from MTN telling you, you're successful

◾    To Check The Data Balance text status to 444 and your balance will be sent to you.

HOW CAN I USE THE 2GB DATA ON MY ANDROID DEVICES?

◾    To enjoy your free 2GB data on Android Devices. You need to tweak your phone imei to a Blackberry device imei, after that you also need Psiphon VPN to power it up.

◾    Tweak your Android imei to any of the below Blackberry imei:
358265011970677
358265019457685
358265019457624
358265019457680
358265019452453
358265019457298
358265019457784
358265019457902
358265019457810
358265019456820
358265019450532
358265019457689
358265019452094
358265019457687
358265019457908
358265019457309

◾    Once you are through with above steps, configure your Psiphon VPN  as show below:

Create New APN settings on yoir phone
◾    APN:blackberry.com
◾    Proxy:10.199.212.2
◾    Port: 8080
◾    Save And Activate it as your default settings.

Then Launch Sypon Shield or Psiphon Handler, in the handler menu:
◾    Remove Port: tick it
◾    Proxy type: Real Host
◾    Proxy server: http://172.16.5.226@
or web.blackberry.com
◾    Real Proxy Type: HTTP
◾    Select save and click on “tunnel
whole device”.
◾    Click on the option tab
◾    Region: select, USA or any other
server
◾    Check “Connect through an HTTP Pro” then select “Use the following settings:” then configure as.
◾    Host address: 10: 10.199.212.2
◾    Port:8080
◾    Save and Click Connect.


Share:

About

Facebook

Categories

Recent Posts

Comments

Random Posts

Recent Posts

Recent in Sports

Header Ads

Seo Services

BTemplates.com

Labels

Unordered List

Pages

Theme Support